

I used a hot glue gun and put some glue on the back to hold it still first then just kept adding glue in the back making a circle. Careful not to burn yourself.


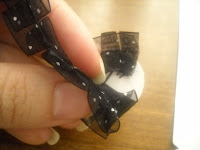


Keep going round while holding the ribbon down in the middle to glue the back.


Now the flower is done and you then add a brad, bling, button, whatever you like or looks good with your ribbon. I just got this bling at Michaels for $1.


The wire ribbon I fold and glue if I don't like the way the edges look. Since this ribbon is bigger, I use the one and a half circle.


Again I glue it in place and start bending since this is wire I can actually get a lot bended and the glue in the back.


Keep going around and gluing and make sure you don't burn yourselves. Then when I get close to the end I then snip the ribbon a little bit bigger to have extra to fold. Then glue in back.


When done you add your button or bling, flower anything that will look good.


On this one I added a button and bling and the other a button with a flower.


This pink ribbon I bought at the dollar tree in the baby isle which is wire I totally liked this one I just didn't have a pink or white button or a big enough bling for it but you get the idea. I hope!!~~LOL~~


Thank you so much for the directions! They are so neat. They are so simple, but they look so intricate. I can't wait to make some of them for my DD!
ReplyDelete